Sensor and transmitter frequently asked questions
Find answers to frequently asked questions related to troubleshooting and best practices for your Medtronic Guardian™ sensor and transmitter.
I need help replacing my sensor
- How do I get a replacement sensor?
- I am still experiencing issues with my transmitter after troubleshooting. What can I do?
I need help charging my transmitter
I need help calibrating my Guardian™ Sensor 3
I need help inserting, taping, and securing my sensor
- What can I do to help my sensor last?
- How do I insert the Guardian™ sensor on the back of my upper arm?
- What do I do if my transmitter does not flash a green light when connected to the sensor?
- Why do I receive 10 pieces of tape and 5 sensors in a product shipment?
- Do I need to use 2 pieces of tape for every sensor?
- Do I have to use the tape that Medtronic sends?
- Where can I purchase or try out additional adhesive or tape options?
- What do I do if I have skin irritation?
- Skin sensitivities, allergies, and skin reactions
- What do I do if my sensor site bleeds?
I need help understanding my CGM alerts and alarms
- What are some of the most common alerts for CGM?
- What is the difference between Blood Glucose (BG) required and Calibrate now?
- What is the Sensor Updating alert and why am I getting it?
- How do I prevent getting CGM alerts at night?
- How do I silence my alarms?
- Why do I keep getting a “Calibration not accepted” alert?
I need help uploading data to the CareLink™ system
I need help replacing my sensor
How do I get a replacement sensor?
Request a sensor replacement on Diabetes.shop.
Tip: Get your sensor lot number ready before you begin the process. You can find this number on the sensor packaging. Watch the video below for more information.

I am still experiencing issues with my transmitter after troubleshooting. What can I do?
If you are still experiencing issues, you can request a replacement.
I need help charging my transmitter
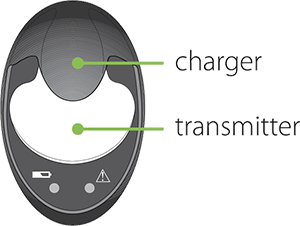
When and how should I charge the transmitter?
Charging your transmitter after each sensor use is important so your transmitter battery lasts 7 days.
When the transmitter is charging, a green light flashes on the gray charger. When charging is complete, the green light on the charger turns off. It can take up to two hours to fully recharge, but typically only takes 15 to 20 minutes. A fully charged transmitter can be used for a maximum of seven days without recharging.
Note: Your transmitter may look different, but the steps to charging it are the same as shown here.
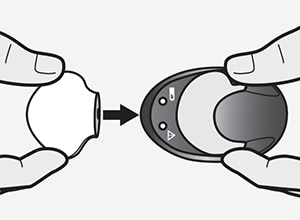
Removing the transmitter from the charger
When you remove the transmitter from the charger, a green light should flash on the transmitter. If you don’t see the green light flash on the transmitter, place the transmitter back on the charger until it is fully charged.

Troubleshooting
If you connect your transmitter to the charger and you see no lights on the charger or a flashing red light, replace the AAA battery in the charger. If the green light stays on without flashing when you connect the transmitter, disconnect it, wait at least 15 seconds, and then try reconnecting.
If there are still no lights on the charger after replacing the batteries, contact 24-Hour Technical Support at 1-800-646-4633 and select option 1.
Check out more transmitter battery tips.
I need help calibrating my Guardian™ Sensor 3
For steps on how to calibrate your sensor, select your device:
MiniMed™ 780G system
MiniMed™ 770G system
MiniMed™ 670G system
MiniMed™ 630G system
I need help inserting, taping, and securing my sensor
What can I do to help my sensor last?
How long your sensor lasts can depend on many factors, and we know things happen in day-to-day life! Here’s what you can do to help your Guardian™ 4 sensor last:
- Find your sweet spot: The Guardian™ 4 sensor is designed and approved to only be worn on the back of the upper arm* which makes it the perfect spot for optimal sensor performance and longevity. So, make sure to stick with this location for the best experience! Don’t forget to choose a flat area on the back of your upper arm where you can “pinch an inch” that’s also free of scar tissue.
- Prep the skin: Before sensor insertion, it's important to prep your skin properly. Clean, dry skin is key. Some soaps have oils that can interfere with adhesive sticking, so give the area a quick wipe with an alcohol swab. And remember, let it dry completely before inserting the sensor!
- Get it to stick: After insertion, when removing the needle from the sensor, hold the base of the sensor firmly in place to prevent any movement that could impact performance. Don't forget about the two pieces of Oval Tape included with your sensor kit. One covers the base, and the other helps secure the transmitter. Feel free to add extra tape if you're extra active or live in a humid area.
- Do not worry if Sensor Updating appears! This is a safety feature that's most likely to happen on the first day. There's nothing you need to do unless your pump alerts you. Most of the time, it resolves on its own in an hour. But if it lasts for more than 3 hours, replace the sensor, and request a replacement sensor.
- Use your resources: If you’re looking to dive deeper, you’ve come to the right place. Need a refresher on how to insert your sensor? Check out this step-by-step instructional video or this one-handed arm insertion video from our very own Ambassador, Rob Howe. Getting help from a friend? This video is the one for you. Need handy hints for making sure your sensor stays put? This Tape Tips Guide can help. The support page you’re on also has loads more info and assistance for all things related to your sensor; make sure to check it out.
*The Guardian™ Sensor 3 is designed and approved to be worn on the abdomen and buttocks (Ages 7-13) and abdomen and arm (Ages 14 and older).
How do I insert the Guardian™ sensor on the back of my upper arm?
See how longtime Medtronic customer, Rob, inserts the Guardian™ Sensor 3 on the back of his arm.

Watch this video for tips on inserting your sensor on your arm with the help of a partner.

What do I do if my transmitter does not flash a green light when connected to the sensor?
If you do not see a green light, follow these steps:
- Try to disconnect the transmitter, wait for several seconds and then reconnect. If the green light still does not flash, charge your transmitter.
- If that doesn’t work, double check to make sure the sensor is fully inserted into your body, and review the technique on how to insert correctly. Check out the Changing Your Sensor video for steps on how to insert correctly.
Why do I receive 10 pieces of tape and 5 sensors in a product shipment?
Each sensor requires 2 pieces of tape.
Do I need to use 2 pieces of tape for every sensor?
Yes, it’s recommended that you use the 2 pieces of tape included with your sensor. There should be a piece of tape covering the sensor and a piece of tape covering the borders of the transmitter. This ensures that the transmitter doesn’t pull away from the body if it gets caught on something, for example, clothing.
Do I have to use the tape that Medtronic sends?
Different tapes and adhesives are available to hold the transmitter in place and you may need to try different products to find the right one for you. You can review the list of additional tapes in Tape tips and site management or check out tapes available on Diabetes.shop.
Where can I purchase or try out additional adhesive or tape options?
You can purchase adhesives and tapes at Diabetes.shop or through the product manufacturer’s website. Here is a full list of product recommendations.
Contact 24-Hour Technical Support at 1-800-646-4633 option 1 for technical assistance or to report product issues. They can also provide a sample kit with various tapes and adhesives.
What do I do if I have skin irritation?
- Change the sensor and insert it into a different approved location or seek guidance from your healthcare provider for another location.
- Avoid sites where clothes may rub, where your body bends a great deal and your beltline if possible. These areas present a higher risk of the sensor and transmitter being accidentally pulled out.
- Do not insert the sensor into an area that is lean, scarred, or hardened. If inserted in these areas, it may decrease the flow of interstitial fluid, or the sensor may kink.
- Try different orientation for the sensor and transmitter. For example, insert so the sensor is on the bottom and the transmitter sits on top. This orientation may help prevent a teeter-totter action at the sensor and transmitter connection which could lead to a lost signal.
Skin sensitivities, allergies, and skin reactions
Allergies and skin reactions such as itching, rashes or bumps may occur. When you notice them, determine the cause and use a different product. If the site becomes irritated or inflamed, the set or sensor should be removed and inserted in a new location.
Check out our helpful Tape Tips and Site Management.
What do I do if my sensor site bleeds
Before applying tape, apply pressure to the sensor insertion site until the bleeding has stopped. Once stopped, wipe away the excess blood gently, dry the area, then apply the tape. If there is too much blood, change out your sensor. If bleeding persists, please contact your healthcare provider.
I need help understanding my CGM alerts and alarms
What are some of the most common alerts for CGM?
What is the difference between Blood Glucose (BG) required and Calibrate now?
- A Calibrate now alert occurs when a calibration is needed for your sensor to continue reading. To clear this alert and to continue receiving Sensor Glucose (SG) values, simply enter your current BG and calibrate.
- A BG required alert occurs when a BG is needed for the SmartGuard™ Auto Mode feature in the MiniMed™ 670G/770G systems or the SmartGuard™ technology feature on the MiniMed™ 780G system to continue running safely. As soon as you enter a new BG, SmartGuard™ Auto Mode or SmartGuard™ technology respectively, will resume (indicated by the blue shield on your home screen).
What is the Sensor Updating alert and why am I getting it?
Select your sensor to get information about the Sensor Updating alert:
How do I prevent getting CGM alerts at night?
CGM alerts at night may be caused by a few different reasons ranging from sensor insertion to site placement. Here are a few tips to help prevent getting CGM alerts in the middle of the night.
- Sensor insertion, site placement, and taping make a difference. For your sensor to work its best, avoid sites where clothing may rub or constrict, where your body naturally bends which may cause the sensor to pull out and where there is a lot of pressure. See how to insert and tape the sensor properly.
- If you use the Guardian™ Sensor 3, know your calibration status. The calibration icon shows how much time is left until your next scheduled calibration is due and calibrating before bed helps reduce the chance of needing a calibration overnight while sleeping.
- Plan ahead. Sleeping in on the weekend? Summer schedule different from the rest of the year? If your schedule changes, think about how your calibration schedule may need to be adjusted to help avoid any unwanted alerts and alarms.
- Customize nighttime alert settings. Talk to your healthcare team about high and low glucose limits overnight to make sure alerts are personalized to meet your needs. You may consider setting both high and low limits differently for the overnight period.
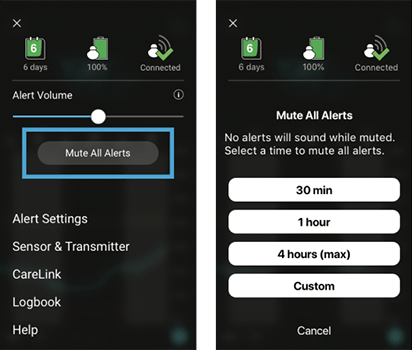
- Consider the Alert Silence or Mute All Alerts feature.
- Your pump has a feature called Alert Silence, where you can temporarily silence alerts. Don’t worry, you will still get important low alerts if Alert Silence is ON. For your safety, Low SG (50 mg/dL or below on the MiniMed™670G/770G systems, 54 mg/dL or below on the MiniMed™ 780G with Guardian™ Sensor 3 and 64mg/dL or below on the MiniMed™ 780G with Guardian™ 4 sensor) as well as High SG (250 mg/dL or higher for more than 3 hours) will always sound, and Alert on Low will sound if it’s turned on. Learn how to set Alert Silence for the MiniMed™ 670G system and MiniMed™ 770G system and for the MiniMed™ 780G system.
- Your Guardian™ Connect system has a Mute All Alerts feature where you can temporarily mute all alerts. You can prevent alerts from making any sound by going to Menu > Mute All Alerts to silence all your alerts for up to 4 hours. None of your alerts will make a sound for the entire time that you choose, except for the Urgent Low Sensor Glucose which will vibrate for your safety.
How do I silence my alarms?
When an alarm occurs, something has been detected that is preventing insulin from being delivered. This must be addressed right away. Alarms cannot be silenced.
Your pump has a feature called Alert Silence, that allows you to temporarily silence glucose alerts. Select your system below to find instructions for how to silence glucose alerts:
MiniMed™ 780G system
MiniMed™ 770G system
MiniMed™ 670G system
MiniMed™ 630G system
Your Guardian™ Connect system has a Mute All Alerts feature where you can temporarily mute all alerts. You can prevent alerts from making any sound by going to Menu > Mute All Alerts to silence all your alerts for up to 4 hours. None of your alerts will make a sound for the entire time that you choose, except for the Urgent Low Sensor Glucose which will vibrate for your safety.
Why do I keep getting a “Calibration not accepted” alert?
If you receive a “Calibration not accepted” alert, it means that the pump couldn’t update your sensor using the blood glucose (BG) value you entered. This could be because:
- The BG entered was not within a range the system was anticipating.
- Your blood glucose levels were rapidly changing.
- You may have used delayed or incorrect BG entries.
- It may be an indication the sensor is not working properly.
If you receive a “Calibration not accepted” alert, wait approximately one hour (or until your glucose is stable) to recalibrate. If you receive “Calibration not accepted” a second time, a new sensor will likely be required. If you have recently eaten, exercised, or taken insulin, you might need to wait a little longer than an hour.
I need help uploading data to the CareLink™ system
How do I upload my CGM data to the CareLink™ system?
If you have a MiniMed™ 780G or MiniMed™ 770G pump with CGM and are using the MiniMed™ Mobile app, the app is already uploading your CGM data to the CareLink™ system for you as long as your app is always open in the background, and you are logged into the CareLink™ system.
If you are unable to use the phone app, get your free blue USB adapter to upload your device. Review steps for how to upload your MiniMed™ 700 series pump using the blue adapter.
If you’re using a MiniMed™ 630G pump or MiniMed™ 670G pump, you’ll need your Contour® Next link 2.4 meter connected to your pump. The end of the meter is a USB that can be plugged into your computer for downloading CGM data. Review steps for how to upload your MiniMed™ 630G or MiniMed™ 670G pump.
Your Guardian™ Connect system is already conveniently linked to your CareLink™ Personal account. To view reports on your computer, login to your CareLink™ account using your username and password you created. From there, you will be able to generate reports with your data for you and your provider to review.


