MiniMed™ infusion sets - Key steps
Back to MiniMed Infusion Sets page
Infusion Set Priming / Fill-tubing Process
Because the safety of our customers is our top priority, we are voluntarily recalling specific lots of infusion sets used with Medtronic insulin pumps.
To avoid potential over-delivery of insulin shortly after an infusion set change It is very important to follow the steps below to prevent fluid from getting on the infusion set membrane during the priming/fill-tubing process:
- After filling the reservoir, make sure the vial of insulin is held upright when removing
the reservoir from the blue transfer guard. This prevents insulin from accidently
getting on the top of the reservoir, which could be transferred onto the infusion set
membrane.
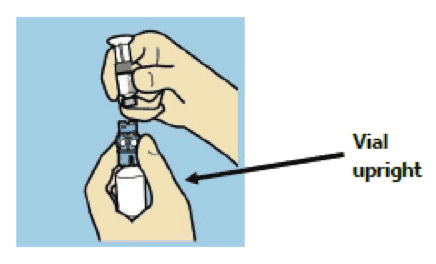
Hold insulin vial upright when removing reservoir.
- If any liquid (such as insulin, isopropyl alcohol, or water) gets on the top of the
reservoir or inside the tubing connector, it can block the infusion set membrane.
This may lead to increased pressure inside the pump’s reservoir chamber during the
priming/fill-tubing process. This may potentially lead to over-delivery of insulin
shortly after the infusion set change. If liquid is visible on top of the reservoir or
inside the tubing connector, start over with a new reservoir and infusion set.
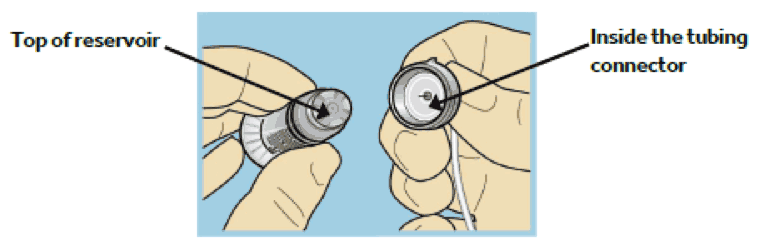
Make sure these are dry when connecting.
If you notice anything unusual after the priming/fill-tubing process, such as insulin continuing to drip or squirt from the infusion set cannula, do not insert. Start over with a new reservoir and infusion set.
Best Practices for Changing Your Infusion Set Include:
- Do not change your infusion set before going to sleep so that you are able to monitor your glucose levels.
- As an extra precaution, check your blood glucose at 1 hour after your infusion set change in addition to your routine monitoring.
Tips for a Successful Infusion Set Change