Using the MiniMed™ Mobile app
Device: MiniMed™ 770G insulin pump
The app may show information differently depending on the compatible mobile device and operating system you use.
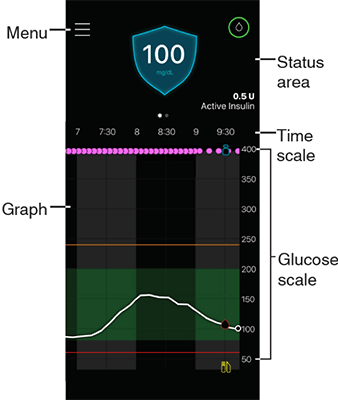
Home Screen
The Home screen shows an overview of data received from the pump. The Home screen is divided into two main areas: the status area and the graph. There is also a Menu button in the top left corner of the Home screen.
The display may vary based on your compatible mobile device and insulin pump model.
If the MiniMed™ Mobile app has not been continuously running in the background on your mobile device, it may take a few seconds for information to appear when you open the app.
Status Area
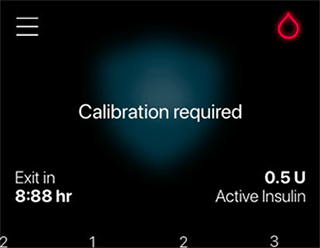
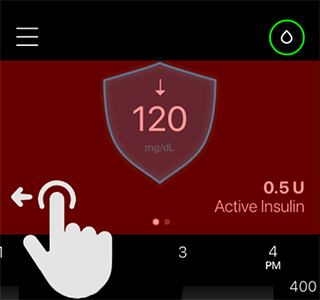
The status area shows the most current data that the pump has sent to the MiniMed™ Mobile app and status messages that may require your attention.
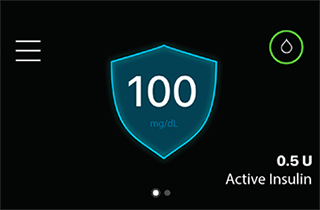
It shows your current sensor glucose (SG) value, trend arrows, active insulin, status icons, and basal rate (when in Manual Mode).
The current data and status messages also appear on the Lock screen of your compatible mobile device.
Active Insulin
The Active Insulin is shown in the Status area. Active insulin is bolus insulin that has been delivered by the pump and is still working to lower your BG levels.
Sensor Glucose (SG) Value
If you use CGM, the status area shows the most recent SG value received from the insulin pump. If the sensor is turned off on the pump, the MiniMed™ Mobile app shows the current active insulin amount where the SG value is usually shown.
Trend Arrows
If you use CGM and the SG value is rising or falling, one, two, or three arrows appear on the Home screen. The more arrows that are shown, the faster the SG value is rising or falling.
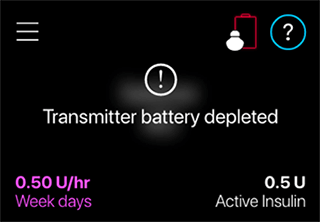
Status Icons on Home Screen
Icons may appear in the status area to inform you about the status of the MiniMed™ Mobile app or the paired pump. You can tap on any status icon to see a message bubble that shows what the icon means.
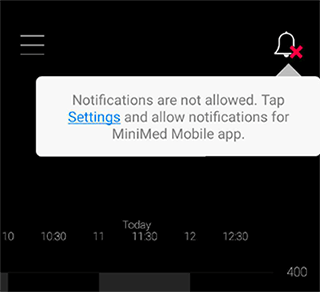
To close the message bubble, tap on your screen anywhere other than the message bubble.
Status Messages
Status messages are shown in the status area. Most status messages are messages from the pump.
Other messages refer specifically to the status of the app itself.
Banners
The banners shown in the status area correspond with the banners shown on your pump.
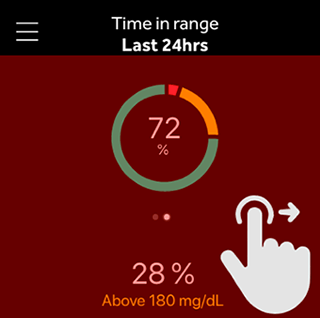
Time in Range
If you use CGM, you can access the Time in range graph by swiping left in the Status area on the Home screen.
The Time in range graph shows the percentage of time you spent in and out of a set sensor glucose (SG) range. This SG range is preset in the MiniMed™ Mobile app and cannot be changed. The preset sensor glucose (SG) range is 70 to 180 mg/dL.
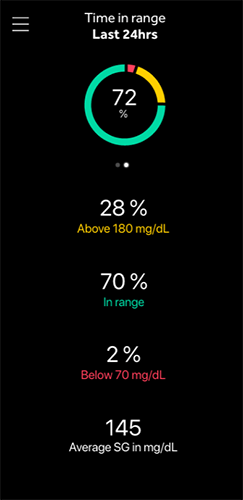
- The orange section shows the percent of time that you spent above 180 mg/dL during the past 24 hours.
- The green section shows the percent of time that you spent between 70 and 180 mg/dL during the past 24 hours.
- The red section shows the percent of time that you spent below 70 mg/dL during the past 24 hours.
- Your average sensor glucose (SG) reading is shown at the bottom of the screen.
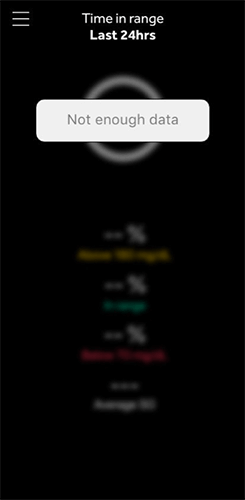
- A “Not enough data” message is shown if there is no sensor data for the past 24 hours.
Swipe right to exit the Time in Range screen.
Graph
The graph shows glucose values and event markers based on the data the app receives from the paired pump.
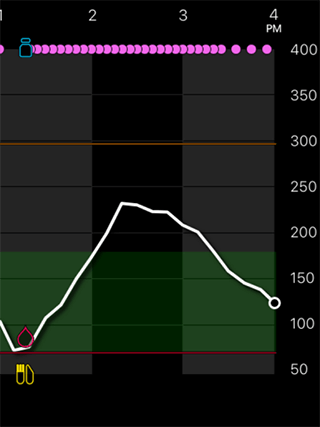
To navigate the graph:
- Swipe left or right over the graph to navigate through past and current data.
- Stretch and pinch to zoom in and out from the 1-hour view to a 24-hour view.
- Double-tap the graph to cycle through the various graph zoom levels (24 hr, 12 hr, 6 hr, 3 hr).
- Tap
 to show your BG reading at that time.
 - Tap
 to show your BG reading at that time. This BG reading was not sent for sensor calibration.
 - Tap
 to show the carb count for the meal you entered.
 - Tap
 to show the amount of bolus insulin delivered and which type of bolus was used.
 - Tap anywhere on the screen to close the event details.
Menu
Tap  on the Home screen to go to the Menu screen.
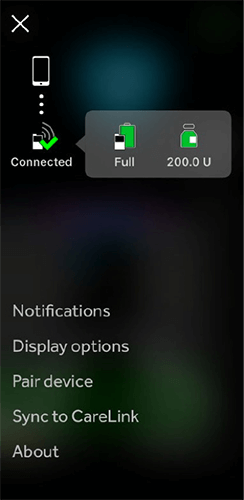
The Menu screen shows the status of the insulin pump system and paired devices. The Menu screen also gives you access to the Notifications settings, Display Options, Pair Device function, Sync to CareLink™ feature, and the About screen. In the About screen, you will find information about the MiniMed™ Mobile app and a link to open the user guide in the app.
System Status Icons
The system status icons on the Menu screen show you the status of your pump and any additional paired devices. The status icon appears on the Home screen, if any status needs attention. Although very similar, you may notice small differences between the icons shown on the pump and the icons shown in the app.
App Status Icons:
| Icon | Name | Description |
|---|---|---|
 |
Blocked notifications | The bell icon appears on the Home screen if the notifications setting is turned off in the MiniMed™ Mobile app, or if the notifications setting is turned off in the operating system of the compatible mobile device. The bell icon does not appear if notifications are turned on, even if the Ringtone Volume on your compatible mobile device is set to silent.
|

 |
Pump connection | The pump connection icon appears with a green check mark when the pump and the MiniMed™ Mobile app are paired and successfully communicating. If communication between the app and the paired pump is lost, the icon appears with a red X. The pump connection icon appears on the Home screen if the app has lost communication with the pump. |


 |
Calibration | If you use CGM, the MiniMed™ Mobile app shows the calibration icon on the Home screen. The color and the appearance of the icon change as the time for the next required calibration approaches. Tap the calibration icon to see when the next calibration is due. The calibration icon with a question mark appears when the time until your next calibration is unavailable. The calibration icon with the three dots appears when the system is not ready for a calibration. |


 |
Transmitter connection | If you use CGM, the transmitter connection icon appears in the Menu screen. The transmitter connection icon appears with a green check mark when the sensor feature is on and your transmitter is successfully communicating with your pump. If the sensor feature is turned on but the transmitter has lost communication with the pump, the transmitter connection icon appears with a red X and also appears on the Home screen. The transmitter connection icon appears with a question mark when the transmitter-to-pump communication status is unknown. This icon appears if the pump has lost communication with the MiniMed™ Mobile app or if the app is trying to receive sensor data from the pump. |


 |
Pump battery | The pump battery icon indicates the charge level of your pump battery. The icons look similar to what is on the pump. The pump battery icon appears on the Home screen when the battery charge is approximately 25% or less. The icon is outlined in red when the pump battery is empty. The icon shows a battery outlined in blue and with a question mark when the charge level of the pump battery is unavailable. This icon appears when the MiniMed™ Mobile app and the pump have lost communication. |


 |
Transmitter battery | If you use CGM, the transmitter battery icon indicates the charge level of your transmitter battery. The icons look similar to what is on the pump. The transmitter battery icon appears on the Home screen when the battery charge is approximately 25% or less. The icon is outlined in red when the transmitter battery is empty. The icon is outlined in blue with a question mark when the charge level of the transmitter battery is unavailable. This icon appears if the pump has lost communication with the MiniMed™ Mobile app or if the pump cannot communicate with the transmitter. |


 |
Reservoir | The reservoir icon shows the approximate amount of insulin left in your reservoir. The icons look similar to what is on the pump. The reservoir icon appears on the Home screen when the reservoir has approximately 25% or less insulin remaining. The icon is outlined in red when the reservoir is empty. The icon is outlined in blue with a question mark when the amount of insulin left in your reservoir is unknown. This icon appears when the MiniMed™ Mobile app and the pump have lost communication. |


 |
Sensor life | If you use CGM, the sensor life icon indicates the number of days until the sensor expires. The icons look similar to what is on the pump. The sensor life icon appears on the Home screen when the sensor expires in less than 24 hours. The icon is red when the sensor expires in 24 hours or less. When the sensor expires, the icon is outlined in red with a white X. Tap on the icon to see how much time remains until the sensor expires. The icon is outlined in blue with three dots when the time until the sensor expires is unknown. If the MiniMed™ Mobile app and the pump have lost communication, the icon is outlined in blue with a question mark. |


|
Suspend by sensor | When using the Suspend before low or Suspend on low features, the suspend by sensor icon appears on the MiniMed™ Mobile app screen. When the Suspend before low or Suspend on low feature is unavailable, this icon appears with a red X. |
Notifications
The MiniMed™ Mobile app lets you receive alarms, alerts, reminders, and messages from your pump on your compatible mobile device.
All notifications from the pump appear at the top of the Home screen. The same notification title and text appear in the app and on your compatible MiniMed™ insulin pump screen.
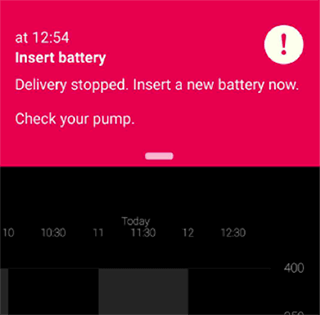
Notifications have a different background color depending on the type:
- Alarm – Red
- Alert – Yellow
- Message – Blue
- Reminder – Gray
Do not rely solely on the notifications from the MiniMed™ Mobile app. Notifications on your compatible mobile device and notifications sent to care partners may not occur as expected. Notifications may not always be noticeable on the app. Always rely on your pump for the notifications.
Always clear notifications on your pump. Dismissing a notification in the app does not clear it on the pump. It is important that you promptly respond to all notifications that appear on your pump. When you respond to a notification, there may be times when another notification appears. Always be sure to address all notifications you receive.
Display Options
When you first set up the MiniMed™ Mobile app, your pump and the app may not have the same carb unit setting.
To set the carb unit in the app:
- Tap
 on the Home screen
 - Tap Display Options.
- Tap on the carb unit that you want to use. A blue check mark appears next to the carb unit that is currently shown in the app.
It is strongly recommended that you use the same carb unit setting on your pump and in the app.
Pair Device
You may need to pair your pump with your compatible mobile device after the initial MiniMed™ Mobile app setup, for example if you get a new pump.
To pair your pump with the compatible mobile device after initial setup:
- On the Menu screen, tap Pair Device.
- A screen appears with options to pair the pump. Do one of the following:
- Tap Pair new pump if you are pairing a new pump.
- Tap Re-pair current pump if you are pairing a pump that was previously paired with the compatible mobile device.
- A screen appears and asks if the compatible mobile device was paired with a pump before. Do one of the following:
- If yes, tap Go to Settings and remove the pump from the device list. After removing the pump from the device list, return to the app. Tap Next.
- If no, tap Next.
- A screen appears and asks if the pump was paired with a compatible mobile device before. Do one of the following:
- If yes, follow the instructions on the MiniMed™ Mobile app screen to remove the compatible mobile device from your pump, and then tap Next.
- If no, tap Next.
- A message appears and reminds you that your pump must be compatible. You must have the Bluetooth™ wireless technology setting on your compatible mobile device turned on. Do one of the following:
- a. If it is turned on, tap Next.
- b. If it is turned off, go to your compatible mobile device settings and turn it on. Then tap Next.
- Select the MiniMed™ pump model that you are using.
- A message may appear on the app screen and ask permission to pair the pump with your compatible mobile device. If this message appears, pair the pump.
- When the pump and the compatible mobile device are paired, a message appears on the app screen. Tap Done.
Sync to CareLink™ feature
The MiniMed™ Mobile app can sync data to CareLink™ software automatically or manually.
The Upload Now option lets you send data to your CareLink™ account to generate reports. This can be helpful before you visit with your healthcare professional to ensure that the most current information is available during your visit with them.
The automatic Sync to CareLink™ feature sends data from the app to your CareLink™ account approximately every five minutes. This feature also automatically sends data used to create CareLink™ reports approximately every 24 hours. The information can be viewed online by you or a care partner on the CareLink™ website at http://carelink.minimed.com.
Your compatible mobile device must be connected to the internet to send data to your CareLink™ account. If you use a cellular connection, your cellular provider data rates may apply. The app uploads data to CareLink™ only when the app is running on the compatible mobile device. The app does not upload data to CareLink™ if you force the app to close.
Keep the app open or running in the background. The Sync to CareLink™ feature default setting is set to on when you set up the app. If the Sync to CareLink™ feature is turned off, the app no longer automatically sends data to your CareLink™ account.