Inserting and starting your sensor
Device: MiniMed™ 770G Insulin Pump
Gather Your Supplies
Before you insert your sensor, gather all of your supplies:
- One-press serter is required in order to insert the sensor properly.
- Guardian™ Sensor 3 is individually packaged and comes attached to a plastic pedestal which is necessary for proper loading into the serter.
- Oval tape is required to keep the sensor securely in place.
- The Guardian™ Link 3 transmitter is connected after the sensor is inserted and covered with the oval tape.
Choose a Site
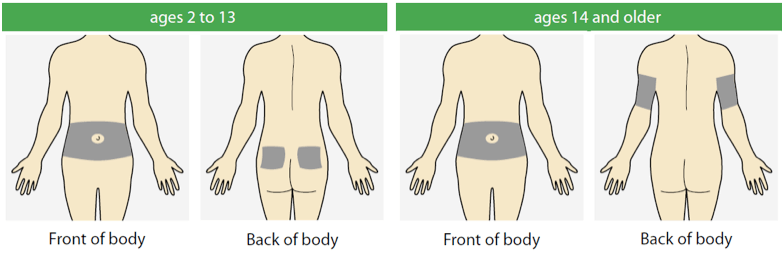
The Guardian™ Sensor 3 has been studied and is approved for use in the following sensor insertion sites by persons of the following ages:
| Approved Age | Sensor Insertion Site |
| 2 to 13 | Abdomen and Buttocks |
| 14 and older | Abdomen and Arm |
Choose a location for inserting your sensor. Shown here are the approved body areas (shaded) for sensor insertion:
The sensor insertion site should be at least:
- 2 inches (5.0cm) away from your navel
- 1 inch away from your insulin pump infusion site
- 1 inch away from any manual insulin injection site (syringe, pen)
For best sensor glucose performance, avoid these sites:
- Where clothing may rub or constrict (for example, your belt line)
- Where your body naturally bends a great deal and may cause the sensor to pull out
- Where you have scarred or hardened tissue or stretch marks
- Where there is a great deal of motion or friction
Inserting the Sensor
Changing the Guardian™ sensor 3 using the One-press serter with your MiniMed™ 770G insulin pump

Starting Your Sensor
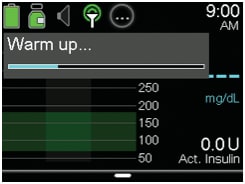
After you insert your sensor and connect your sensor and transmitter, your pump starts communicating with the transmitter. The pump notifies you when the sensor is ready to use.
To start a new sensor:
Select Start New Sensor when it appears on the pump screen.
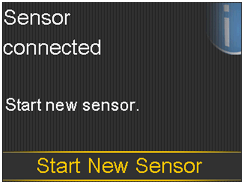
- The “Sensor warm-up started” message will appear.
- Select OK.
“Warm up…” will appear on the Home screen until sensor is ready for first calibration.
Disconnecting the Transmitter and Removing the Sensor
When your sensor life is depleted you will need to remove your sensor to insert a new one.
To disconnect the transmitter from the sensor and remove the transmitter:
- Carefully remove the tape and any additional adhesive from the transmitter.
- Remove the adhesive tab from the top of the transmitter.
- Hold the transmitter with one hand and pinch the flexible side arms of the sensor with the thumb and forefinger of your other hand.
- Gently pull the transmitter away from the sensor.
- Pull the sensor away from your body to remove it.
- Dispose of the sensor properly, in a sharps container.
- Place the transmitter on the charger.